Introducing light interception of leaves
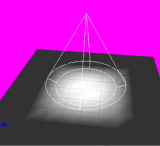
Open the file Light.gsz. This is a simple model of a plant that will grow (produce new leaves and internodes) and branch, while each leaf intercepts light from a lamp hanging over it. One of the first things that come to mind when thinking about plant functions is, of course, photosynthesis. In order for the plant to do photosynthesis, it needs energy, water and CO2. Thus, first, some plant parts (normally the leaves), need to intercept and absorb light and transfer part of the energy gained from this process onto specialized molecules. Let us first look at light capture: There are several ways to model this. The nice thing about a 3D model is that we have information about the position of each leaf. We further have information about the position of light sources. To model the light environment in our 3D scene, we first have to create a light source. The following code defines a new lamp:
//a module defining the lamp:
module MyLamp extends SpotLight {
	{
		setPower(200.0); // power in W
		setAttenuationDistance(50.0); //in m
		setAttenuationExponent(0.0);
		setInnerAngle(22.5 * Math.PI/180.0);
		setOuterAngle(30 * Math.PI/180.0);
	}
}
This light source is a spotlight, we set a power of 200 W and two values for the opening angle of the lamp shader (inner and outer angle). The other parameters (concerning attenuation) are not interesting at the moment. Look up the class SpotLight in the API documentation:
This light source has to be coupled with a light node so that we can move it around in the scene. The following code defines a light node:
//a module defining the light node:
module MyLight extends LightNode(0.0, 1.0, 1.0) {
	{ setLight(new MyLamp());}
}
Note that we actually also give the emitted light a color with the constructor of light node: The three arguments are for red, green, and blue, and at the moment this gives all white light. However, as the LightNode is “masked” by the object MyLamp you have to comment it out to see the effect of changing the color in the LightNode:
//a module defining the light node:
module MyLight extends LightNode(0.0, 1.0, 1.0) {
	{ setLight(new MyLamp());}
}
//a module defining the light node:
module MyLight extends LightNode(0.0, 1.0, 1.0) {
	//{ setLight(new MyLamp());}
}
The lamp then has to be inserted into the scene, you do this inside the init() method:
protected void init()
[
	Axiom ==> //insert a plane here
	[ Plane().(setShader(WHITE))]

	Bud(1, PHYLLOCHRON, 1);
	//insert the lamp here
	==>> ^ M(50) RU(180) MyLight;
]
Also, we want to insert a white plane into the scene so that the simulated plant is no longer “floating” in space but instead is rooted in the plane. The Plane object is inserted using its constructor, Plane(), followed by the setShader command, and it is put into brackets (like a branch) so that the turtle will be in the right position at the start of the simulation of the plant. We do this by precaution here – it is actually not really necessary (try removing the square brackets and see that the effect is the same). You might have noticed with astonishment that we now have a new type of transformation operator: \=⇒> It is called a graph transformation operator, and that’s all you need to know for now. In fact, we use it to insert things like lamps that do not strictly belong to the L-system string. And that also explains the other, unusual, fact that this rule has no left-hand-side! (Actually this is normal, since we are not replacing anything here (Axiom, or a symbol), but only inserting an object). The lamp is placed 50 units above the plant and then turned downwards (RU(180)) to make sure it shines on the plant. You can modify the angle to observe the effect, e.g. RU(60).
Then we have to invoke the radiation model of GroIMP, just before the init() method:
//definition of an instance of LightModel:
LightModel lm = new LightModel(100000,5);
Furthermore, the Leaf module receives a parameter named al that stores the value of absorbed light after each run of the light model:
module Leaf(float al) extends Parallelogram(2,1) {
	{setShader(new AlgorithmSwitchShader(new RGBAShader(0,1,0), GREEN));}
}
Note that the shader of the leaf looks rather complicated: we are using a so-called AlgorithmSwitchShader, this is a class of shader that allows us to use one shader for the light model (“GREEN”) and another one (RGBAShader) for the visualization. We would namely like to see from the color of the leaf how much light it has absorbed. For instance, it could be dark green if it has absorbed almost nothing and very bright green or yellow if it has absorbed a lot.
In the run method, the Leaf is initiated with al = 0, thus Leaf(0).
Bud(r, p, o), (r < 10 && p == 0 && o < 4) ==> RV(-0.1) Internode Node
		[RL(BRANCH_ANGLE) Bud(r, PHYLLOCHRON, o+1) ][ RL(LEAF_ANGLE) Leaf(0) ]
		RH(GOLDEN_ANGLE) RV(-0.1) Internode Bud(r+1, PHYLLOCHRON, o);
Furthermore, we have to introduce a new method, absorb(), which will invoke a method of the radiation model that measures the amount of absorbed light for each leaf and writes the result to the parameter al (you can write this method after the run method):
//the new protected method absorb()
protected void absorb()
[
	lf:Leaf ::> {lf[al] = lm.getAbsorbedPower3d(lf).integrate()*2.25;
	//println(lf[al]);

	}
]
The rule in this method updates the parameter al of Leaf, by letting the LightModel instance lm calculate the absorbed power. As this is done separately for red, green, and blue light, we have to also invoke integrate() and multiply by a factor 2.25 to convert from W to µmol photons (the input later for the photosynthesis model). In order to see immediately how much light a leaf has absorbed we can use a println() command, it will print out the value of lf[al] into the XL console window below, however, at the moment it is commented out. Note that the println command will go to the next line after printing while a simple print command would stay on the same line.
Note that we make this method protected (like the run() method is now), because we are not going to invoke absorb() or run() directly but from another method that we will call grow():
//the new public method grow()
public void grow()
{
	run();
	lm.compute();
	absorb();
}
This method invokes run() once, then runs the light model (lm.compute()), then the rule absorb(), which measures light. We are thus dealing here with a method that does not contain L-system rules itself but that will instead invoke other methods containing L-systems. Note that this is the reason why the body of the method is surrounded by a pair of curly braces (accolades), { and }, and not square brackets, [ and ], as we know it from methods containing L-system rules.
Next, we have to add in the absorb() method a command that will reset the shader of the leaf each time the method is carried out:
//the new protected method absorb()
protected void absorb()
[
	lf:Leaf ::> {lf[al] = lm.getAbsorbedPower3d(lf).integrate()*2.25;
	//println(lf[al]);
	lf.(setShader(new AlgorithmSwitchShader(new RGBAShader(lf[al]/5.0,lf[al]*2,lf[al]/100.0), GREEN)));
	}
]
Note that the shader of each leaf is now reset using the value of al to paint the leaf, thereby indicating the amount of absorbed light, a gradient of green.
Task: Do some simulations with different plant parameters (L. 60 – 63, e.g., you could change the phyllochron). Manually change the position of the lamp by selecting it in the scene and dragging it at one of the arrow tips. This can be done during the simulation. Observe the effect on light interception of the leaves.


